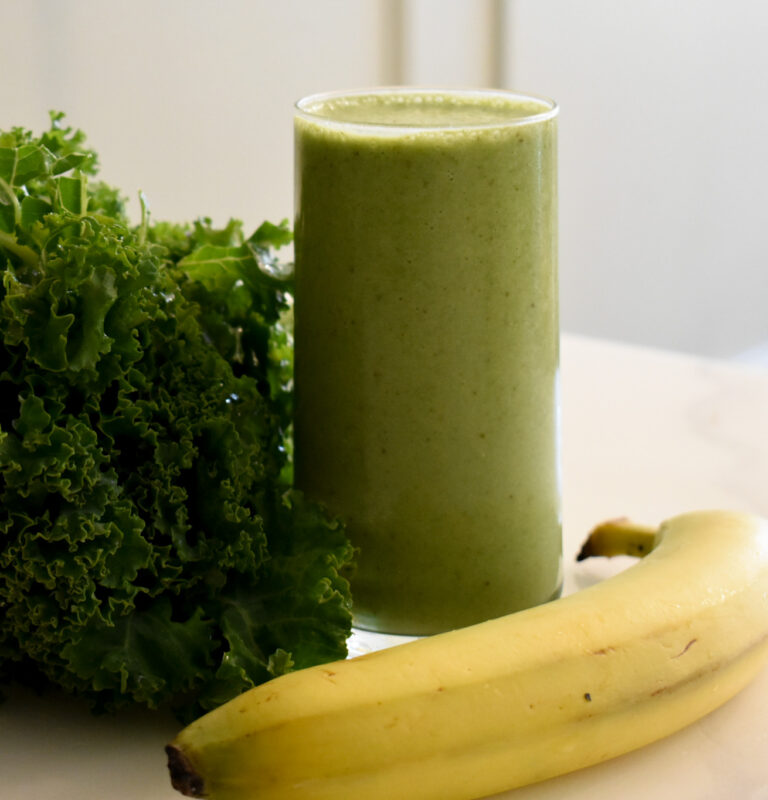
Whole Milk Yogurt

This yogurt will exceed your expectations. It’s creamy, tangy, and ridiculously easy to make. The best part? You’ll never have to buy yogurt again.

Did you know that you can whip up some delicious homemade yogurt with only two ingredients? That’s right, all you need is some milk and a small amount of leftover yogurt and voila, you have yourself the creamiest yogurt imaginable. And the best part is that you can flavor it just the way you like it. My favorite is mixing in a little vanilla extract and honey, or to spice things up, you can add cinnamon and nutmeg to ring in the fall season. Most of the time I end up eating it plain because it’s just that good.


yogurt and granola on wooden board


What is Yogurt?

Yogurt essentially is cultured milk, or milk that’s been heated and allowed to sit in a warm spot while bacteria from the added cultures multiply (in this case, we’re using a small amount of plain yogurt). During this time, the milk undergoes a process of fermentation where the sugars in the milk break down and produce lactic acid, which thicken up the yogurt and give it its notable tangy flavor.


What are the Health Benefits of Yogurt?

Yogurt is the OG probiotic. Because it is rich in live, healthy bacteria, it provides reinforcement to your gut’s microbiota. And guess what? You need a healthy gut microbiota in order to properly digest your food and fight against pathogenic bacteria. I don’t have the best natural immune system, so I know that if there’s a new strain of the common cold going around, I’m bound to get it. But I’ve found that when I’m regularly consuming this yogurt, my colds are shorter or I don’t get sick at all!

Can we talk about how abundant yogurt is in vitamins and minerals? It is rich in calcium, which we all know is super beneficial in aiding bone and teeth formation, but did you know that it also regulates our nerve signals, muscle contractions, and sleep cycle? We need calcium in order to go about our normal daily activities. In just one cup of yogurt, you’ll have already packed away nearly half of your daily value.

Yogurt also takes the prize for the amount of protein it offers. Protein is your body’s building blocks, and even if you’re not trying to bulk up, your body still needs protein to maintain strong muscles, healthy skin, and healthy nerve functions. Protein aids in metabolism and energy expenditure, helping you feel more energized for the day ahead. It can curb weight gain by managing your appetite, helping you feel more full and reducing the craving to consume empty calories.

yogurt and granola on wooden board


How Much Yogurt Should I Eat in a Day?

To start the day off right, I would suggest you incorporate a cup of yogurt into your breakfast every morning. It’s such an easy meal that to neglect this superfood is to sell yourself short. It also doesn’t hurt to have it as an afternoon snack. After all, it’s delicious and can satisfy your appetite for hours.


How Do You Make Yogurt?

    • Step 1: Heat up 2 quarts of whole milk over the stovetop, stirring occasionally, until it reaches 180 degrees or a skin develops on top. The main reason this is done prior to fermenting is to improve the texture of the yogurt and kill off any potentially harmful bacteria.

    • Step 2: Remove the pot of milk from the heat and let it cool down until it’s about 120 degrees. This usually takes about 20 mins.

    • Step 3: Add 1/4 cup of plain greek yogurt. Think of this as your “starter.” The bacteria already present in the greek yogurt will multiply in the pot of warm milk, which is why it’s important to make sure “live active cultures” is listed under the ingredients section on your yogurt carton. To make your next batch of yogurt, you can simply save 1/4 cup of your previous batch to use as a starter. Stir thoroughly until the yogurt has completely melted into the milk.

    • Step 4: Strain the milk and yogurt mixture to remove any milk skins that developed during the heating process.

    • Step 5: Transfer milk and yogurt mixture into clean glass jars. I like to use a funnel for this part because I can’t seem to avoid making a mess without it.

    • Step 6: Wrap the jars in a towel to conserve warmth and let them sit out on the counter for anywhere between 8-12hrs, depending on how sour you like it. In the winter months, I like to put my jars into the oven with just the oven light on while I let them ferment. This environment is just warm enough for my yogurt to ferment properly without accidentally baking it.

    • Step 7: This next step is optional, especially if you like a thicker yogurt. Once the yogurt has finished fermenting, open the jars. You’ll notice that the yogurt has thickened up and separated from the whey. Line a bowl with a cheesecloth (double it up if the holes are pretty large) and pour the yogurt over top. Then pick up the corners of the cloth and tie them in a knot. You can then tie this to a hook or a cabinet knob somewhere in the kitchen and allow the yogurt to passively strain into the bowl over the next 2-4 hrs. Once done, you’ll have yourself a fresh batch of creamy, delicious whole milk yogurt.

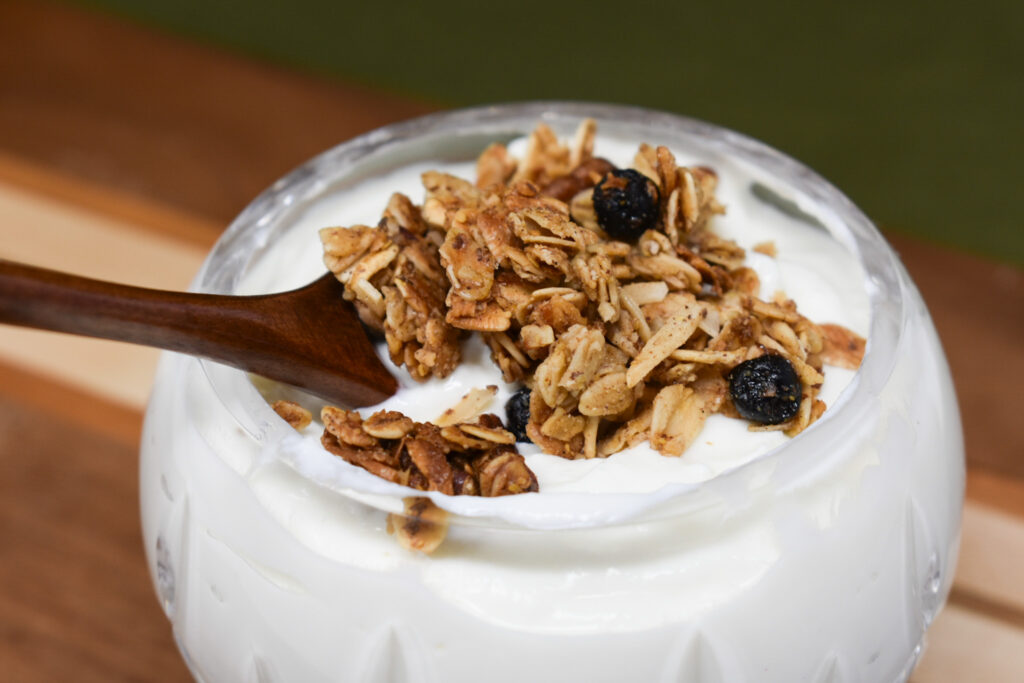
You can enjoy this yogurt for anywhere between 2-3 weeks if kept refrigerated! Add a little honey and this cinnamon maple granola for a delicious fall treat.

Yield: 4 cups

Whole Milk Yogurt

yogurt and granola on wooden board

This creamy homemade yogurt is made from two simple ingredients: whole milk and starter yogurt. Add a little vanilla and brown sugar to flavor!

Cook Time 25 minutes
Additional Time 12 hours
Total Time 12 hours 25 minutes

Ingredients

  • Whole Milk
  • Plain greek yogurt

Instructions

  1. Heat up 2 quarts of whole milk over the stovetop, stirring occasionally, until it reaches 180 degrees or a skin develops on top.
  2. Remove the pot of milk from the heat and let it cool down until it’s about 120 degrees. This usually takes about 20 mins.
  3. Add 1/4 cup of plain greek yogurt. Stir thoroughly until the yogurt has completely melted into the milk.
  4. Strain the milk and yogurt mixture to remove any milk skins that developed during the heating process.
  5. Using a funnel, transfer milk and yogurt mixture into clean glass jars.
  6. Wrap the jars in a towel and let them sit out on the counter for anywhere between 8-12hrs, depending on how sour you like it.
  7. Optional: Once the yogurt has finished fermenting, line a bowl with a cheesecloth (double it up if the holes are pretty large) and pour the yogurt over top. Pick up the corners of the cloth and tie them in a knot. Tie this to a hook or a cabinet knob somewhere in the kitchen and allow the yogurt to passively strain into the bowl over the next 2-4 hrs. Once done, transfer the yogurt into a large clean jar and store in the fridge.

Notes

The longer you let the yogurt ferment on the counter, the more tangy your final product will be. I like my yogurt more on the sour side, so I usually let it ferment for 12 hours before straining.

If you have a sweet tooth, you can add flavors to your yogurt! Here are some ideas.

  • 2 tbsp brown sugar + 1 tsp vanilla
  • 3 tbsp white sugar + 1 tbsp lemon juice
  • 3 tbsp white sugar + 1 tbsp lime juice
  • 1 scoop of jam per serving

Leave a Reply

Your email address will not be published. Required fields are marked *

share this recipe:
Facebook
Twitter
Pinterest

Still hungry? Here’s more

Skip to Recipe